Five Week Fixes - Week One
Friends it has been a WEEK!
My awesome sister picked up the keys for me on Friday afternoon and drove up to meet Ryan and I so we could get some stuff done. She also stayed all day Saturday and scrubbed the place down while we were at a wedding - she’s my hero! She got so many windows sparkling, and most importantly she scrubbed down our kitchen and took it from a terrifying nightmare to a clean, usable space. We are so beyond grateful and we’re now calling her AndreaCleanstheMess.
Cleaning is going to be an ongoing process through this renovation of course but it does feel good to know that we’ve gotten a lot done!

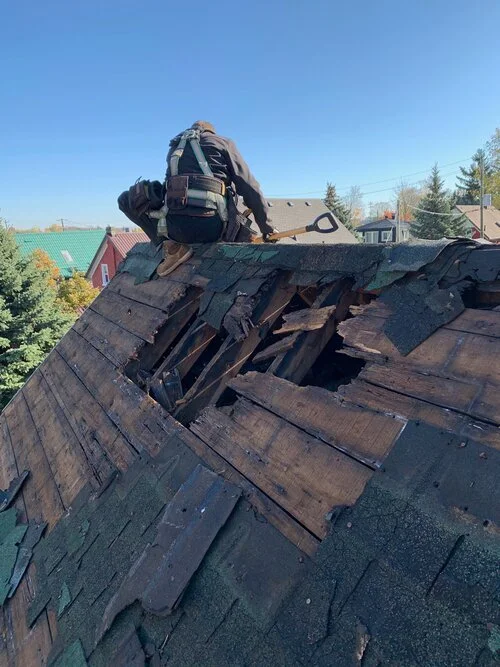
Another big ticket item for this week was the roof. I hired Roofworkx and their team was at the house bright and early Saturday morning for what should have been a pretty easy, one-day job tearing out the old roof (which was already kind of crumbling) and installing the new one. Instead I got a call at 9:00am on Saturday letting me know that there were at least 4 layers of shingles on my roof. Local building code is that you can have a maximum of two layers of shingles on your roof and having more is problematic for a number of reasons. My roofers now had to remove more than twice as much old roofing as they anticipated, much of the lower layers of which were flaking off and required extensive cleanup. Monday I got another fun surprise - a whole section of roofing was totally gone underneath the shingles. I’m so grateful that they’ve taken their time to make sure everything is done properly, and that they’ve been super communicative with me through the process. In the end problems with the roof were something I’d anticipated and I’m just glad that the roof is now finished and watertight!

One of our other tasks for this week was hanging all the blinds and shades on the main floor. I’ve installed tons of blinds in the past and it’s usually a really easy process so I thought we’d have the whole main floor installed in an afternoon. I did not anticipate old house problems. Since I’m using “cheap” vinyl miniblinds (fun fact: not that cheap when all your windows are custom sizes) I was really insistent on installing within the window frames so the blinds would be as inconspicuous as possible. In this house though that means a lot of too-shallow window frames, odd angles for drilling, and drilling into plaster walls. In short, Ryan and I have been tearing our hair out trying to get these installed but we’re finally done! It’s crazy how much bigger, brighter, and cleaner everything looks with these blinds on vs. the smoke-filled curtains they had before!

Master Bedroom Before: Semigloss walls, smoke-filled curtains, two layers of linoleum floor.

During! This area has had a full TSP wash, two coats of primer on the walls and one on the trim and ceiling. Andrea cleaned the windows, we removed the curtains and one layer of flooring.
On Wednesday night some of our wonderful friends came over (as did my parents) and they helped us scrub the walls in the master bedroom, remove a tricky cabinet, and get some primer up. It was so crazy to see the stains coming off the walls. The previous owner smoked a lot in the house so there are years of smoke buildup staining all the walls. Our cleaning method is working wonderfully. First we mixed up a bucket of water mixed with TSP as per the directions on the bottle and scrubbed the walls with it using a sponge mop. Then, we went back in with clean sponge mop and used water to scrub and rinse the surface. Once clean and dry, we applied two coats of Kilz primer which was low odor and will give our fresh paint something to adhere to, as well as covering up some of the stains! It honestly feels like a different room now that it’s primed! It’s a little overwhelming to think of how much of the house we still need to tackle, but it’s awesome to see how much of a difference this can make!
Ryan and I are off on our cruise tomorrow but I’ll have another update after week two!
To Do
Remove flooring in the entry, kitchen, hallway, landings, upstairs bedrooms, and bathrooms
Install vinyl tile downstairs
Install laminate upstairs
Demo the bathroom
Install new tub
Tile both bathroom floors and the shower
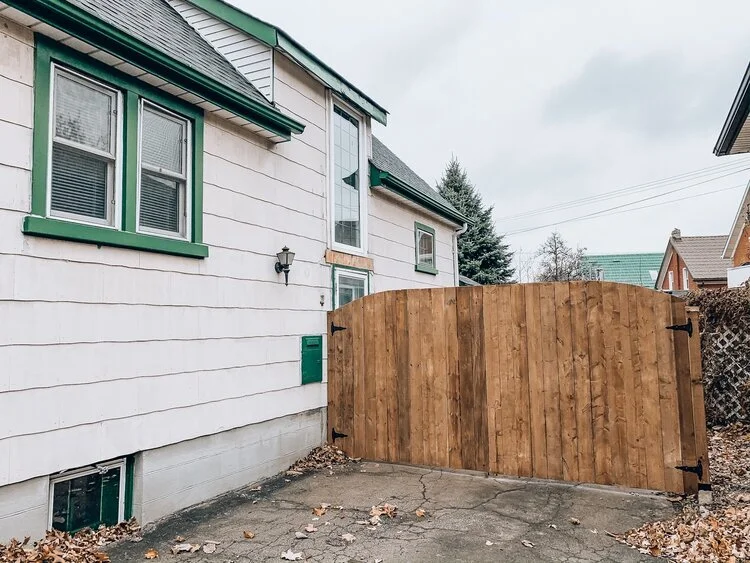
Install gate to close off the backyard and fence along one side
Frame out the new fireplace enclosure
Remove quarter round upstairs
Replace light fixtures
In Progress
Install blinds on all the windows (main floor, upstairs) - main floor done!
Clean all the walls with TSP to prep for paint (main floor, upstairs) - upstairs bedrooms cleaned!
Prime and paint all walls and ceilings in the entire house - master bedroom primed (2 coats)!
Prime and paint all the upstairs trim and doors - master bedroom trim primed!
Done
New roof