

Budget Bathroom - Full Reno for $2,000!


When I bought this mess on Mill Street it needed a lot of help and work. The roof needed replacing ASAP, the whole house needed so much paint and flooring, the yard is a hot (now cold) mess, and I’ve already designed the IKEA kitchen of my dreams ahead of a full kitchen reno in the next year. But one thing I was ADAMANT needed to be addressed in the initial five week reno was a full reno on the only full bathroom.
At first I planned only to replace the tub and tile a new shower surround and then just give a facelift to everything else. In the end the bathroom got fully gutted and everything is brand new (at least to me).
The only reason I was able to do this bathroom so cheaply is because of a lot of elbow grease - not only my own but also that of my incredible family and especially my dad. None of us have professional experience but we all were willing to put in work, research and learn, and get our hands dirty. My dad (and B.J., my second dad) are not strangers to projects like this and their help was so invaluable.
I also shopped very carefully and strategically. I’ll try to detail everything I bought below!
Before & After


I honestly could barely get the camera into the space. There was a poorly installed tub with jets, very yellowed shower surround, and smoke-filled shower curtain on this side.


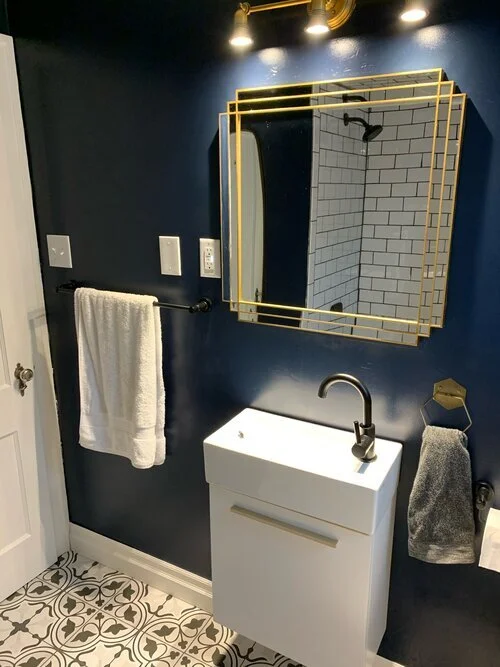
This was all pulled out and replaced with a new fibreglass tub, and subway tile shower surround. I added two built-in niches backed with the same patterned tiles I used for the floor. Most of the house has original brass hardware on the doors so I’ve tried to bring brass through the house as the primary metal. I know mixed metals are trendy but I’m not a huge fan myself. I priced brushed brass or gold-toned faucets and shower heads and they were absolutely not in the budget. In the end I went with matte black which was more expensive than chrome but cheaper than brass and I think complements the other black accents well.
The toilet was so low to the ground and close to the tub that even at 5’7” my knees touched the tub when I sat on it. Replacing it with a taller one and rotating it gives way more leg room.

The sink ended up being a huge problem. When I decided to rotate the toilet I planned to use a $100 IKEA sink/vanity combo which I had bought back in November. When we got to installing it in December, I realized I hadn’t accounted for the swing of the bathroom door and it was going to be too large for the space. I ended up with this small wall-mount which keeps the space feeling open. We do have a half bath upstairs next to the bedroom so that’s where we brush our teeth and get ready for bed anyways so the small sink here isn’t really an issue.
Since I painted almost the entire house the same shade of white I thought the bathrooms would be a fun place to play with some colour and I’m in love with this blue (Royal Navy from Valspar).
Plumbing
There ended up being a lot of unexpected plumbing in this project. Because we weren’t moving any of the components (apart from a slight rotation of the toilet) I initially didn’t think we’d need to do much actual plumbing. In the end though there was actually quite a bit. We had to replumb the tub drain which was on the wrong side of the tub, replumb the toilet drain entirely to be separate from the sink and tub, run a new water line for the toilet, move the sink plumbing into the wall, and just generally do a lot of figuring things out. All the extra worked dragged out this project so that it didn’t get done until the end of December, but it was so worth it. I now feel really confident that everything is done well and will hold up, and as frustrating as it was I learned so much through the process.
Budget Breakdown
My initial budget for this project was $1400 but at the time I planned to keep the existing sink/vanity and toilet. I had also budgeted for chrome fixtures before I changed my mind. I definitely went a little over my initial budget but I’m pretty proud of how cheaply this bathroom was completed. All of these prices are in Canadian dollars and include tax (and shipping where applicable) because I think it’s important to have real numbers! I utilized a lot of sales on these so the prices I paid are not always what you’ll see on the websites but links are there for interest.
For the tub/shower:
White Subway Tile - $140
Moen Genta Posi-Temp Tub and Shower Faucet Trim Kit in Matte Black - $230 (by some miracle the house already had the right valves in place for this, the old faucet had also been Moen and with the posi-temp fittings)
MAPEI Ultracolor Grout in Charcoal - $84 for three bags (used this for the floors too)
MAPEI Caulk in Charcoal - $60 for three tubes (used other areas as well)
Soap holder - $5 for one
Shower rod - $18 from Solutions
Shower curtain - $32 from Target
Curtain liner - $12

This medicine cabinet niche was already built into the wall and since there’s hardly any storage in this bathroom I wanted to keep it - but with a nicer mirror.

I found this light-weight mirror at HomeSense, discounted because it was missing a piece of glass. I added a piano hinge so it could act as a door.
Sink/vanity:
Jacuzzi Matte Black Faucet & Accessories - $135 (truly this was the biggest steal of the project. It includes the faucet, drain, toilet paper holder, towel rod, and robe hook)
Mirror - $20 from HomeSense
Piano hinge - $7 from Lowe’s
General:
Paint - Valspar Simplicty - two gallons, one of Swiss Coffee and one of Royal Navy - $74
Toilet - $114 (not available on the Costco website, bought it in the warehouse)
Light fixture - FREE from Kijiji
Bulbs - $17
Bath mat - $18 from Target
Matches - $14
Misc. plumbing, backer board, and supplies - $300
Total: $2,051
Overall I am so thrilled with how this project turned out! It looks amazing and best of all we don’t have to shower at the gym anymore!
Next up I’ve got an update on the dining room and hopefully the living room will follow soon after!
Mel

